macOS Monterey 上で日本語レポート作成環境を整える
はじめに_
homebreおよびemacsがインストール済みとする。
LaTeX_
mactexのインストール_
TeXWiki: homebrewを用いたインストールに従い、インストールする。結構時間がかかるので注意(私の環境では2時間以上かかった)。
% brew install mactex --cask
% eval "$(/usr/libexec/path_helper)"
% sudo tlmgr update --self --all
% sudo tlmgr paper a4

% brew install evince
参考
確認_
埼玉大学工学部情報システム工学科LaTeX用学位論文テンプレート(非公式)からファイルをダウンロードし、コンパイルおよびPDFファイルを作成できるかを確かめる。
% cd
% git clone https://github.com/yuichigoto/tex-template-ics.git
% cd tex-template-ics/Jpn/BMthesis
% platex sample.utf8.tex
% dvipdfmx sample.utf8
% evince sample.utf8.pdf &
ヒラギノフォントを使う_
参考URL
- macOS Big Sur 移行メモ (Homebrew, MacTeX)
- Github: munepi/bibunsho7-patch
- Homebrewを使ってmacOS CatalinaにMacTeX-2020をインストール
生成されるPDFファイルの標準フォントが綺麗なものではない。macOS標準のヒラギノフォントを使う場合には以下の操作を行う。
% brew install gnupg
% sudo tlmgr repository add http://contrib.texlive.info/current tlcontrib
% sudo tlmgr pinning add tlcontrib '*'
% curl -fsSL https://www.preining.info/rsa.asc | sudo tlmgr key add -
% sudo tlmgr install japanese-otf-nonfree japanese-otf-uptex-nonfree ptex-fontmaps-macos cjk-gs-integrate-macos
% sudo cjk-gs-integrate-macos --link-texmf
% sudo kanji-config-updmap-sys --jis2004 hiragino-highsierra-pron
このままだとPDFファイルを生成できないので以下の処理をする。
% git clone --recursive https://github.com/munepi/bibunsho7-patch.git
% cd bibunsho7-patch/
% sudo ./Patch.sh
フォントが綺麗になっていることを確認する。
% cd ~/tex-template-ics/Jpn/BMthesis
% platex sample.utf8.tex
% dvipdfmx sample.utf8
% evince sample.utf8.pdf &
yatexのインストール_
LaTeX形式のファイル作成支援環境 yatex のインストールする。インストールにはemacsのバッケージシステムを用いる。
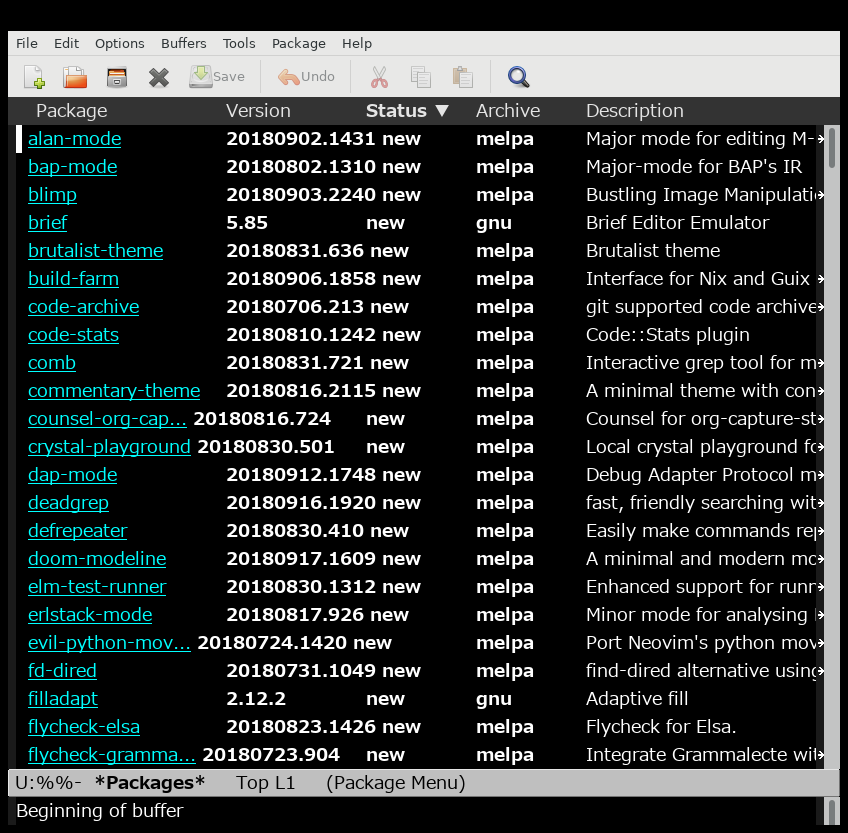
emacs上でM-x package-list-packages を実行する。M-x (Escキーを押しながらxキーを押す)を押し、ミニバッファに「package-list-packages」を入力する。なお、Tabキーによる補完機能があるので適宜利用すると便利(「pac」まで入力し、Tabキーを押すと「package」と補完してくれる)パッケージリストが以下のように表示される。

このリストの中からyatexパッケージを探す。emacs上でC-s (Controlキーを押しながらsキーを押す)を押すとミニバッファが入力待ちなるのでyatexと入力する。するとyatexという文字までカーソルが飛ぶ。Enterキーを押して検索モード終了。
「yatex」という文字にカーソルを合わせてEnterキーを押す。するとemacsが二画面表示になり、下の表示欄に「Install」というボタンが表示される。マウスでカーソルをあわせ、Installボタンを押す。その後、一度、emacsを終了する。
~/.emacs.d/init.elにyatexの設定を加える。emacsで~/.emacs.d/init.elを開く。
% emacs &
init.elの「(provide 'init)」の上に以下の内容を追記し、保存する。
;; YaTeX
(leaf yatex
  :commands yatex-mode
  :mode (("\\.tex$" . yatex-mode))
  :init
  (setq YaTeX-inhibit-prefix-letter t)
  (setq tex-command "platex")
  (setq dviprint-command-format "dvipdfmx %s")
  (setq dvi2-command "open -a Skim")
  :config
  )
emacsを終了し、設定を反映させる。
% cd ~/.emacs.d
% emacs --batch -f batch-byte-compile init.el
~中略~
In toplevel form:
init.el:238:9:Warning: assignment to free variable ‘tex-command’
init.el:239:9:Warning: assignment to free variable ‘dviprint-command-format’
init.el:240:9:Warning: assignment to free variable ‘dvi2-command’

(上記のようなエラーがでるかもしれないが無視してよい)
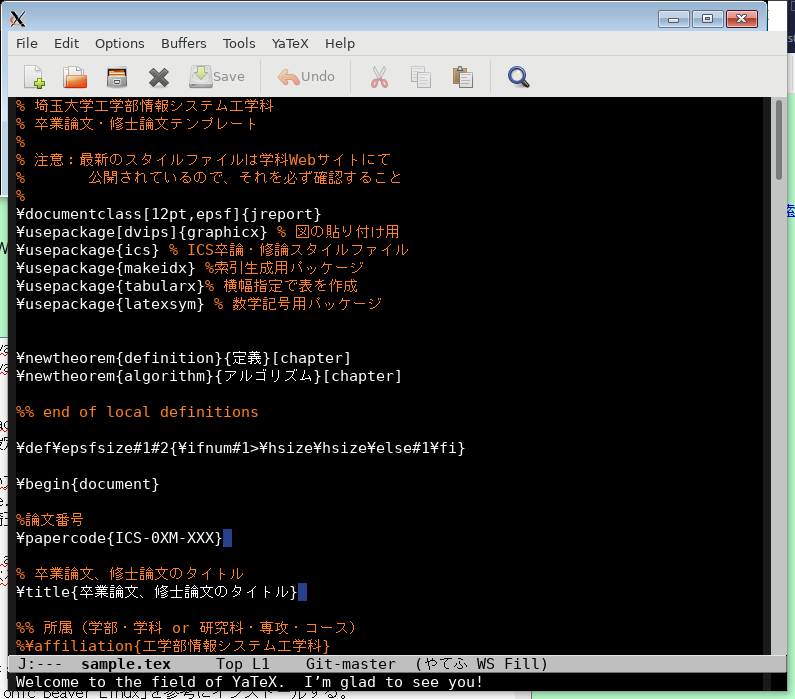
先ほどの tex-template-ics/Jpn/BMthesis/sample.utf8.tex をemacsで開き、YaTeXモードになっているかを調べる。なお、emacsがすでに起動している場合は起動しなおすこと。
YaTeXモードが読み込まれていると以下のようにemacsのミニバッファにメッセージが表示される。

R_
さまざまなインストール方法があるが、今回はUbuntu利用者と環境を合わせるため、homebrewを用いてインストールする。結構時間がかかるので注意。
インストールする。
% brew install r
起動してみる。終了はメッセージのとおりq()を入力する。その後の選択はnを入力する。
% R

R version 4.0.5 (2021-03-31) -- "Shake and Throw"
Copyright (C) 2021 The R Foundation for Statistical Computing
Platform: x86_64-apple-darwin20.3.0 (64-bit)

R は、自由なソフトウェアであり、「完全に無保証」です。
一定の条件に従えば、自由にこれを再配布することができます。
配布条件の詳細に関しては、'license()' あるいは 'licence()' と入力してください。

R は多くの貢献者による共同プロジェクトです。
詳しくは 'contributors()' と入力してください。
また、R や R のパッケージを出版物で引用する際の形式については
'citation()' と入力してください。

'demo()' と入力すればデモをみることができます。
'help()' とすればオンラインヘルプが出ます。
'help.start()' で HTML ブラウザによるヘルプがみられます。
'q()' と入力すれば R を終了します。

> q()
Save workspace image? [y/n/c]: n
Inkscape_
% brew install --cask Inkscape
起動する。
% inkscape &
gimp_
% brew install --cask gimp
起動する。
% gimp &